Who'd think your old cardboard boxes could transform your home into a festive wonderland? Well, it's true! You're about to learn how to create stunning Christmas decorations from cardboard.
No need to break the bank or fret over intricate designs. With a bit of creativity, you'll be crafting trees, ornaments, wreaths, and even a charming gingerbread house.
So, roll up your sleeves and let's turn those plain boxes into something truly magical this holiday season!


The Basics of Using Cardboard for Decorations
 You'll need five basic tools to start creating your own Christmas decorations from cardboard boxes.
- A sharp utility knife is essential for precise cuts.
- A straight edge or ruler helps in making straight cuts.
- Glue or a hot glue gun for binding pieces together.
- A pencil for marking measurements.
- Finally, your main material - a durable piece of cardboard.
Cardboard durability is key here, as it must withstand cutting, folding, and gluing without falling apart. You'd want your recyclable decorations to last the festive season, after all.
Besides being eco-friendly, these decorations add a unique, personal touch to your holiday decor.


Crafting a Cardboard Christmas Tree
 Now that you've gathered your materials and are familiar with the basics, let's move on to the fun part of the project, crafting a cardboard Christmas tree.
Begin by cutting out triangular sections from your cardboard box. These will form the layers of your tree. Stack them from largest at the bottom to smallest at the top, ensuring tree stability. Attach them using a strong adhesive or hot glue.
Next, let your creativity flow with color applications. Grab your paints and brushes to add a vibrant green hue to the cardboard. Don't forget to paint some brown for the tree trunk!
How to Make Cardboard Box Christmas Ornaments
 Now, let's get you started on crafting your own unique cardboard box Christmas ornaments.
You'll find a range of design ideas, followed by step-by-step instructions to help you assemble your ornament.
We'll wrap up with tips on customizing your decoration to make it truly yours.
Ornament Design Ideas
While it may seem unconventional, you can create stunning Christmas ornaments from cardboard boxes that'll leave your guests in awe.
Let's start with cardboard stockings. Cut out stocking shapes from a sturdy box, decorate with paint or glitter, and hang them for a festive touch.
Next, consider an upcycled advent calendar. Cut 25 small doors into a large cardboard box, one for each day leading up to Christmas. Behind each door, you can place small treats or handwritten messages. Adorn the box with holiday drawings or stickers to enhance its charm.
These ornament ideas are simple, eco-friendly, and fun to make. With a dash of creativity, you'll turn ordinary cardboard boxes into extraordinary holiday decor.
Assembly Instructions
You've got your designs ready, and now it's time to delve into the assembly instructions for creating your cardboard box Christmas ornaments. Start by cutting out your shapes from the cardboard, ensuring box durability by using the sturdiest parts.
Next, paint or decorate them as per your design. Don't forget to punch a hole on top for the string.
Your sustainable design aims to reduce waste, so remember to use both sides of the cardboard. Once your ornaments are dry, thread a colorful string through the hole. Knot it securely and there you have it - homemade, eco-friendly ornaments!
These instructions aren't only simple but also encourage creativity and sustainability. So, get started and transform your used boxes into festive decor.
Decoration Customization Tips
After assembling your cardboard ornaments, you might want to customize them, and for that, we've got some handy tips.
Start with color selection. Choose a palette that complements your home's festive décor. You can paint the boxes in traditional Christmas colors like red, green, and white, or go for a modern aesthetic with metallics or pastels.
Box sourcing is another essential aspect. Look for solid, sturdy boxes that can withstand decoration and handling. Consider the size too. Smaller boxes make cute, miniature ornaments while larger ones can be used for statement pieces.
Remember, creativity is key when customizing. Use glitter, ribbons, or craft paper to add unique touches.
With these tips, you'll have beautiful, bespoke cardboard box Christmas ornaments in no time.
Creating Festive Cardboard Wreaths
 Let's dive into how you can craft festive cardboard wreaths that'll add a unique touch to your holiday decor.
You'll need a cardboard box, scissors, glue, and your choice of wreath embellishments.
Begin by cutting out a circular shape from the box, creating a donut-like form as your wreath base.
Sustainable crafting is all about utilizing what you have, so don't shy away from using leftover ribbons, fabric scraps, or even old Christmas cards as embellishments.
Arrange these items creatively on your wreath base, securing them with glue.
Remember, there's no right or wrong in design, it's all about your personal touch.
Let it dry, and voila! You've got yourself an eco-friendly, homemade Christmas wreath.
Cardboard Box Snowman: Step-by-Step Guide
 Let's move on to a fun, frosty project: a Cardboard Box Snowman.
First, we'll go over what you'll need to gather up - don't worry, the list is short and sweet.
Then, we'll guide you through the assembly process step-by-step.
Gathering Necessary Materials
Usually, you'll need to gather the following materials to craft your cardboard box snowman. Material sourcing is a big part of this process, so pay close attention.
For box selection, you'll need three cardboard boxes of varying sizes - small, medium, and large. These will form your snowman's body. You'll also need white paint, a paintbrush, black and orange construction paper, scissors, and glue.
Remember to be creative when gathering your materials. Maybe you have some old buttons or fabric lying around that could be used for your snowman's eyes and scarf. This is your project, so feel free to make it as unique as you'd like! Just ensure you gather all your materials before starting to avoid any unnecessary interruptions.
Snowman Assembly Process
You've gathered your materials, and now you're ready to put together your cardboard box snowman, but first make sure you have a spacious and clean area to work on.
Begin by stacking three different sized boxes, largest to smallest, to form the snowman's body. Secure them with strong adhesive for snowman durability.
Next, create the face and buttons using colored paper and attach them with glue. The hat and scarf can be made from leftover cardboard, painted, then fastened securely.
Consider your snowman's outdoor placement; a covered spot is best to protect it from the elements. Finally, apply a weather-resistant spray to increase longevity.
Congratulations, you've built a festive, durable cardboard box snowman!
Personalizing Your Snowman
In spite of having a basic snowman structure, adding personal touches can transform it into a unique, eye-catching decoration. Consider snowman costume ideas to give your cardboard creation a distinctive look. You could dress your snowman in a top hat and scarf, or perhaps a festive holiday sweater. Don't forget to give him a face. Use markers, paint, or even glued-on buttons to create an expressive countenance that conveys his personality.
To take your personalization a step further, why not incorporate snowman storytelling activities? Develop a backstory for your snowman, and let it influence his appearance. Is he a jolly snowman who loves Christmas carols? Or a grumpy snowman who's not a fan of the cold? The sky's the limit when it comes to personalizing your cardboard box snowman.
Making a Cardboard Box Santa Claus
 Let's move on to the fun part: crafting a whimsical Santa Claus out of a cardboard box. Your box selection is crucial; choose a sturdy, sizable box to accommodate Santa's wardrobe.
It's time to let your creativity shine! Start by painting Santa's jolly face and bushy beard on the box's front side. Don't forget his twinkling eyes and cherry-red nose!
Then, cut another smaller box to resemble Santa's hat, painting it a festive red.
For Santa's wardrobe, wrap a large piece of red fabric around the box, securing it with glue or tape. Add a black paper belt and gold buckle for the perfect finishing touch.
Stand back and admire your handy work, you've just created a charming cardboard box Santa Claus!
DIY Cardboard Christmas Lights
 Next, we're going to tackle something that'll really brighten up your cardboard Christmas scene: DIY cardboard Christmas lights. Not only will these lights add a warm glow, but they'll also highlight the cardboard durability of your decorations, ensuring your festive display stays intact.
First off, cut out small bulb shapes from your cardboard. You'll need about twenty for a decent string of lights. Paint these bulbs in vibrant colors and let them dry. Meanwhile, take a long piece of twine for your light string. Attach the bulbs using hot glue, spacing them evenly.
For the light installation, gently push small LED lights through the back of each bulb. Remember, safety first! Ensure the lights are cool to touch.
Voila! You've made your own cardboard Christmas lights!
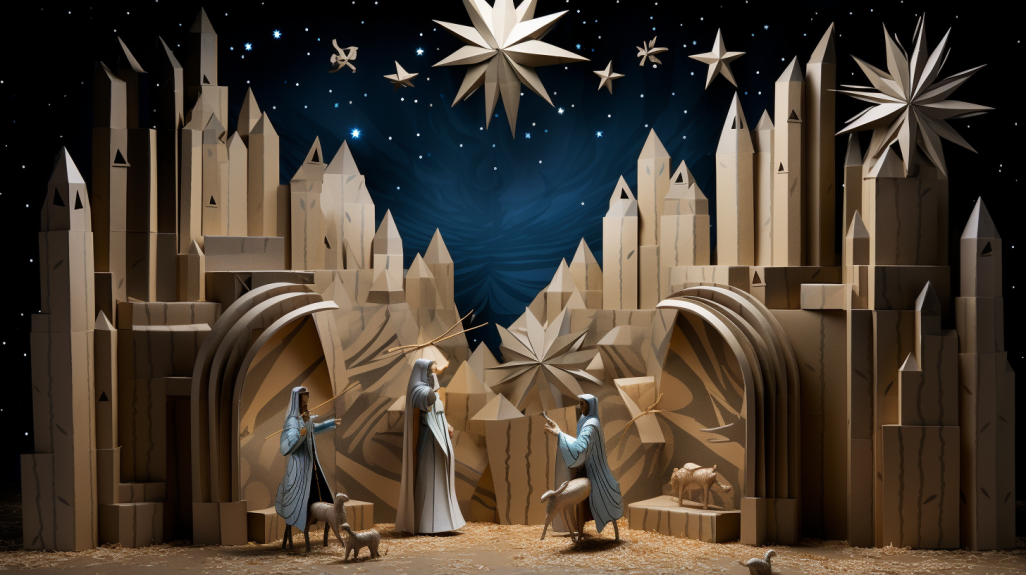
Building a Cardboard Nativity Scene
 Let's get into building a cardboard nativity scene, a timeless centerpiece for your Christmas decor.
First off, you'll need to choose suitable boxes, considering size and sturdiness.
Then comes the fun part, assembling your scene with creativity and precision, a step-by-step process we're about to explore.
Choosing Suitable Boxes
You'll need to consider your nativity scene's size when selecting the right cardboard boxes. Box selection is crucial. For larger figures, like Mary, Joseph, or the stable, go for larger appliance boxes. For smaller items, shoe or cereal boxes work best. Remember, you can always cut down bigger boxes to size.
Your recycling methods matter too. Look for boxes with minimal ink or glossy finishes, as they're harder to paint over. Corrugated cardboard is sturdy and ideal for this project. If you're reusing boxes, make sure they're clean and dry. This guarantees your nativity scene will last the entire festive season.
Nativity Scene Assembly
So, you've gathered your boxes, and now it's time to start building your cardboard nativity scene.
First, sketch out your stable design inspiration on the largest box. Cut it out with a sharp craft knife, being careful to retain the base of the box for stability.
Next is the nativity painting techniques. Use earthy tones for the stable, and brighter shades for the figures. Lightly sketch your characters before painting for accuracy. After painting, cut out your figures, glue them onto cardboard for extra strength, and attach them to the stable.
Remember, creativity is key here! Add hay-like strips of yellow paper, glittering stars, or even twinkling fairy lights.
Your cardboard nativity scene is sure to be the highlight of your Christmas decorations.
Designing a Cardboard Christmas Village
 Creating a quaint Christmas village out of cardboard boxes isn't as challenging as you might think. Start by gathering different sized boxes; these will form the buildings. To ensure box preservation, seal the cardboard with a clear, protective spray.
Now, sketch out your village design, detailing each building's facade with doors, windows, and rooftops.
To bring your village to life, focus on village lighting. Strategically cut small holes in each building. Insert a battery-operated tea light through the bottom, creating a warm, inviting glow.
Decorate with paint, glitter and cotton wool for snow. Be creative, the more details the better.
In no time, you'll have a charming cardboard Christmas village that's not only cost-effective but also environmentally friendly.
Ideas for Decorating a Cardboard Gingerbread House
 When it comes to crafting a cardboard gingerbread house, you've got endless options for decoration, and it's only limited by your imagination. Start by creating gingerbread detailing using brown paint, markers, or even cut-outs from brown paper. It's all about layering, so don't be afraid to add depth for a more realistic look.
Next, it's time for candy accents. Draw or paint on colorful gumdrops, peppermint swirls, and candy canes. You could also cut out images from magazines, or use stickers for a fun, 3D effect.
Frequently Asked Questions
What Type of Paint Is Best to Use on Cardboard Decorations?"
When painting cardboard decorations, you'll find acrylic paint ideal. It dries quickly, minimizing waiting time. You can also experiment with different color combinations, bringing your creative vision to life on the cardboard's surface.
How Can I Make My Cardboard Decorations More Durable for Outdoor Use?"
To make your cardboard decorations more durable for outdoor use, consider weatherproofing techniques. Apply a layer of sealant or varnish. Also, material layering can add strength. Use multiple cardboard pieces for added durability.
Are There Any Safety Precautions I Need to Take While Using Cardboard for Decorations?"
Absolutely! Ensure cardboard's flammability doesn't pose a risk. Don't place cardboard near heat sources or open flames. Also, if you've kids, make sure small decorative parts aren't a choking hazard. Safety first!
Can I Recycle These Cardboard Decorations After Christmas?"
Absolutely, you can recycle your cardboard decorations. Just ensure they're free of non-recyclable materials. It's a simple step in the recycling process, significantly reducing environmental impact. Let's continue the festive cheer with eco-friendliness!
What Are Some Creative Ways to Light up My Cardboard Decorations?"
You can creatively light up your decorations using various lighting techniques. Try embedding LED lights or sustainable sources like solar-powered fairy lights. Painting with glow-in-the-dark paint is also a unique, eco-friendly option.
Conclusion
With a bit of creativity, those plain cardboard boxes transform into magical Christmas decor. From a DIY tree to whimsical ornaments, festive wreaths to a cheery snowman, every corner of your home can twinkle with holiday spirit.
Even a nativity scene or a Christmas village, crafted with care, adds a unique touch. And let's not forget the joy of decorating a cardboard gingerbread house.
So, start reimagining your boxes and let the holiday crafting begin!


