Did you know 37% of homeowners have experienced pipe damage due to freezing? Don't let yourself be part of that statistic. Wrapping your outdoor spigot isn't just practical, it's essential. You're not just protecting your pipes, but also your peace of mind.
Let's dive into the materials you'll need, the process, and some troubleshooting tips. You've got this, and we're here to guide you every step of the way.


Key Takeaways
- Wrapping your outdoor spigot is important to prevent freezing water and costly repairs.
- Choose insulation material that can withstand harsh weather conditions, such as foam or fiberglass.
- Use essential tools like a utility knife, tape measure, staple gun, and gloves for the wrapping process.
- Regularly inspect, maintain, and winterize your wrapped outdoor spigot to ensure its longevity and prevent damage.


Understanding the Importance of Wrapping Your Outdoor Spigot

It's crucial to understand why you'd need to wrap your outdoor spigot, particularly to prevent any potential damage from freezing temperatures.
You see, when water freezes, it expands. If this happens in your spigot, it can lead to cracking and even bursting. Not only can this cause a significant mess, but it can also result in costly repairs.
Spigot durability is key here. Wrapping your outdoor spigot can drastically improve its lifespan, saving you the headache of frequent replacements. A well-protected spigot can withstand harsh weather conditions, thus serving you reliably for years. You're not just maintaining your spigot, but you're also protecting your investment.
Now, let's talk about cost implications. It might seem like a minor detail, but fixing a burst spigot can dig a deep hole in your pocket. The cost of hiring a professional plumber, coupled with the price of new parts, can quickly add up. On the other hand, wrapping your spigot is a simple, inexpensive DIY task. The materials needed are readily available and affordable. So, by wrapping your spigot, you're not just preventing potential damage, you're also saving yourself a good chunk of change in the long run.
Materials Needed for the Task

You're about to embark on the crucial task of insulating your outdoor spigot. Selecting the right insulation material is a key part of that process. It's not just about picking any insulation, but about choosing one that'll deliver optimal performance in keeping your spigot freeze-proof.
But that's not all. You'll also need the right tools to get this task done efficiently. So, we'll delve into the essential tools required for this task, equipping you with the practical knowledge to make your DIY insulation project a success.
Choosing Right Insulation Material
Choosing the right insulation material for your outdoor spigot can be a bit tricky, but don't worry, we've got some great tips for you.
When it comes to insulation durability, always opt for a material that can withstand harsh weather conditions. Foam and fiberglass are excellent choices, as they are both resistant to moisture and temperature changes.
Now, let's talk about material cost effectiveness. You want to ensure you're getting the most bang for your buck. Foam is typically cheaper than fiberglass, but it also tends to be less durable. On the other hand, investing in fiberglass might save you money in the long run, as it's likely to last longer.
Ultimately, the choice depends on your specific needs and budget.
Essential Tools Requirement
Now let's move on to the tools you'll need to properly install your insulation. Tool selection is key for successful installation, and proper maintenance ensures longevity of these tools.
First, you'll need a utility knife for cutting the insulation to the right size.
Second, a tape measure is essential to ensure accurate measurements.
Third, grab a staple gun to secure the insulation to your spigot.
Lastly, a set of gloves protects your hands during the installation.
Each tool has a unique role, contributing to a smooth, efficient process.
Remember, these are your tools, your companions in this task, treat them well. Clean and store them properly after use.
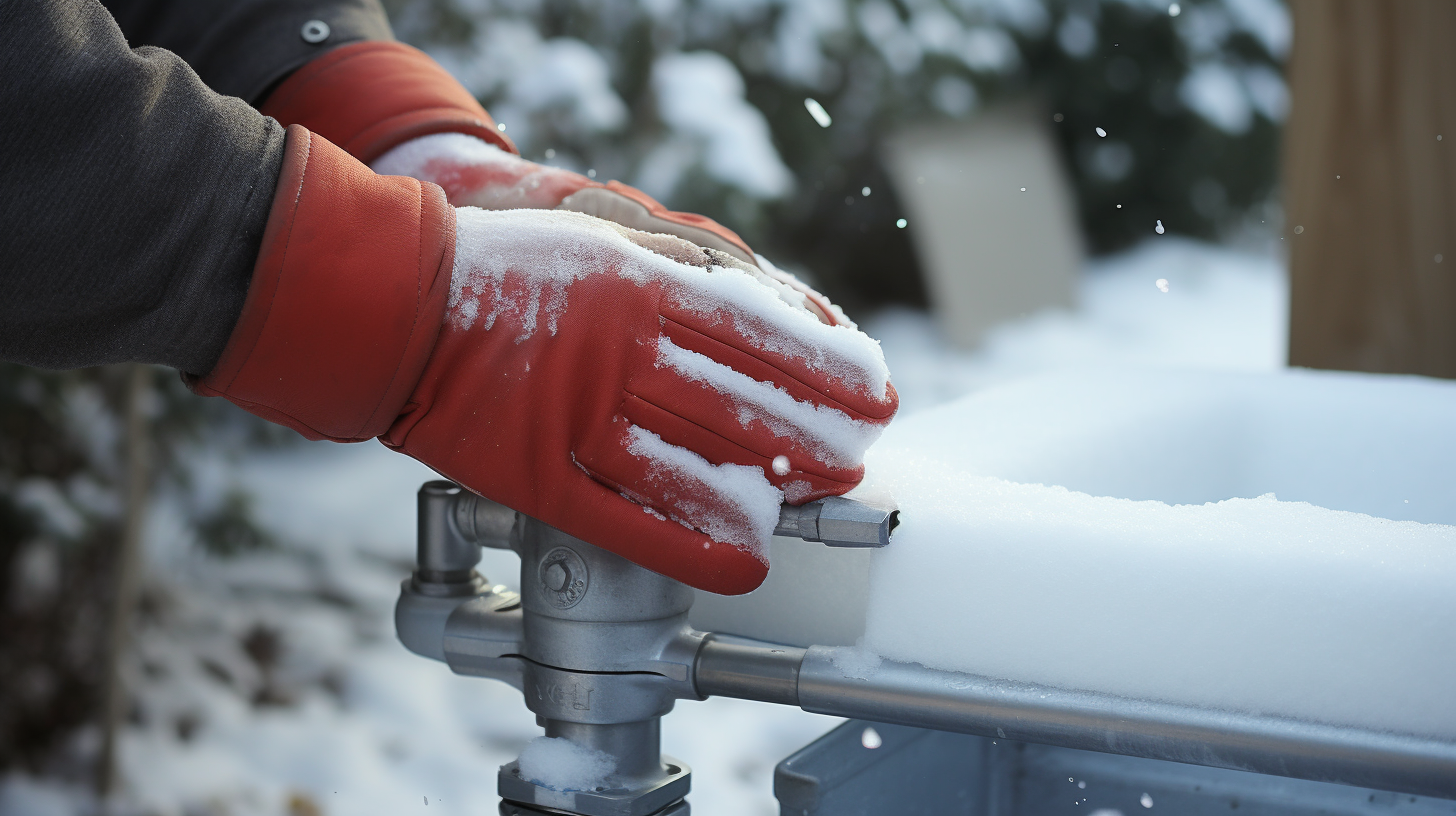
Step-by-Step Guide on Wrapping an Outdoor Spigot

You've gathered your materials and you're ready to tackle wrapping your outdoor spigot.
Now, let's dive into the practical, step-by-step process of how to get it done effectively.
With detailed knowledge and the right approach, you'll find it's a task you can handle with ease.
Materials Needed
Before getting started, it's important to gather the necessary materials to wrap your outdoor spigot properly. Remember, different spigot types may require different DIY techniques, but don't worry, you're part of this awesome community of DIY enthusiasts and together, we can tackle any project.
-
Insulation Cover: This can be foam or fiberglass. It's used to encase the spigot and provide a primary layer of insulation.
-
Weather-resistant Tape: This is to secure the insulation cover and provide an added layer of protection.
-
Plastic Bag: This will serve as an additional layer to protect against moisture.
-
Zip ties or Twist Ties: To secure everything neatly in place.
That's it! Now you're well-prepared to wrap your outdoor spigot so it can weather any storm or freezing temperatures.
Wrapping Process
Let's dive into the process of insulating your water source so it's all set for the harsh winter. Your spigot location and weather impact are crucial factors to consider. Now, let's get practical.
| Step | Instruction |
|---|---|
| 1 | Locate the outdoor spigot |
| 2 | Clean the area around the spigot |
| 3 | Wrap insulation foam tightly |
| 4 | Secure it with insulation tape |
| 5 | Check for any uncovered spots |
Start by locating the spigot, ensuring it's clean. Then, wrap the insulation foam tightly around it. Secure the foam with insulation tape, checking for uncovered spots. Always remember, the weather's impact can be ruthless, and proper insulation means you're part of a community that takes home maintenance seriously, making you feel like you truly belong.
Potential Issues and How to Troubleshoot Them

In case you're encountering problems with your outdoor spigot, don't worry, there are several troubleshooting steps you can follow. You're not alone in this; many have faced and overcome similar issues, so you're part of a community that understands your struggle.
-
Leakage detection: First, check for leaks. Leaks can be a major cause of problems. If you notice any water seeping from the spigot when it's turned off, you've got a leak.
-
Inspect the seal: If there's a leak, the next step is to inspect the seal. If it's worn out or damaged, that could be the source of the issue.
-
Repair or replace: Depending on the condition of the seal, you might be able to repair it. If it's beyond repair, however, you'll need to opt for a spigot replacement.
-
Wrap it right: Finally, once you've addressed any leaks and replaced the spigot if necessary, make sure you wrap it properly to prevent future problems.
Tips for Maintaining Your Wrapped Outdoor Spigot

Maintaining your sealed water source shouldn't be tough; it's all about regular checks and timely fixes. You're part of a community of homeowners who take pride in their property and understand that spigot longevity is key to avoiding costly repairs down the road.
So, let's go over some practical tips that will help you keep your outdoor spigot in top shape.
First, make sure to inspect your spigot regularly, especially after winter. Look for any signs of leaking or damage. If you spot a problem, don't ignore it. Address it promptly to prevent further complications.
Secondly, consider winterizing techniques. As the cold months roll in, water inside your spigot can freeze and cause damage. To prevent this, disconnect any hoses, drain the remaining water, and use a faucet cover for extra protection. You're not alone in this - we've all had to hunker down and protect our homes from the harsh winter weather.
Seasonal Considerations for Outdoor Spigot Wrapping

You've got to consider the changing seasons when it comes to protecting your water source from the elements. Climate impacts can vary dramatically, and understanding them is key to proper freeze protection.
Here's a handy guide to help you prepare for each season:
-
Winter: This is when freeze protection is most crucial. Insulate your outdoor spigot and cover it with a protective shell. This will prevent the water inside from freezing and causing pipe bursts.
-
Spring: With the thawing of ice, check for any leaks or damage that may have occurred during winter. Make any necessary repairs promptly.
-
Summer: Insulation can cause overheating in hot weather. Remove the protective cover to prevent this.
-
Autumn: Before the first frost sets in, drain any remaining water from the pipe and wrap your spigot in preparation for winter.
Remember, each season brings its own challenges, and your actions can help to mitigate any potential damage. You're not just protecting your water source, you're also becoming a more responsible and proactive homeowner.
Frequently Asked Questions
What Are the Potential Health Hazards if I Don't Wrap My Outdoor Spigot?
If you don't wrap your outdoor spigot, freezing risks could crack the pipe, causing leaks. This may lead to water contamination from soil and debris, potentially affecting your home's water quality and your health.
Can I Hire a Professional to Wrap My Outdoor Spigot and How Much Would It Cost?
Yes, you can hire a professional. They're wizards at spigot wrapping techniques! Costs vary, but expect to shell out around $100. It's a small price for peace of mind and avoiding potential health hazards.
Is There a Specific Type of Wrapping Material That Is More Environmentally Friendly?
Absolutely, there are green alternatives for wrapping material. Consider using sustainable insulation options like recycled denim or wool. They're not only effective, but also better for the planet. You're part of the solution!
Can Wrapping an Outdoor Spigot Increase the Value of My Property?
While wrapping your spigot may not directly boost your property's value, it can reflect well on overall maintenance and enhance aesthetic appeal. So yes, in a way, it can contribute to your property's worth.
Are There Any Legal Regulations or Restrictions Related to Wrapping an Outdoor Spigot?
You're wondering about spigot insulation laws and regional restrictions. Typically, there aren't legal regulations for wrapping outdoor spigots. However, local codes may vary, so it's always wise to check with your city office.
Conclusion
So, there you have it! With the right materials and a bit of elbow grease, you've got your outdoor spigot wrapped up nice and snug.
Remember, it's not just about preventing pipe bursts in winter but also maintaining your spigot all year round.
Keep an eye out for possible issues and troubleshoot promptly.
It's like wrapping a gift, but this one's for your home!


